Last Modified: December 7, 2006
When you buy your first SLR camera, it's totally useless without a lens, so you're going to have to get at least one. I recommend that you get at most one or two when you start. Then learn to use them, see what you like and dislike about them, and then you'll have a much better idea of what to get next. Unless you know something about photography, it's probably a bad idea to buy all of your first lenses at once.
Here's far more than you probably want to know about lenses, but at least the recommendations are short and to the point.
In the description of your lens, the focal length is the part that's usually followed by "mm". For example, a "300mm f/4" lens has a focal length of 300 millimeters. Zoom lenses allow you to vary the focal length. The description of a zoom lens can be like this: "35-105mm f/4", which means that the lens can operate at any focal length between 35 and 105 millimeters. This lens will always have an aperture of f/4, no matter which focal length you use. More common is a zoom lens with a description like this: "35-105mm f/4-5.6". This lens has the same focal length range, but at 35mm, it is an f/4 lens and at 105mm, it is an f/5.6 lens. In between the two extremes, the focal length will vary between f/4 and f/5.6. Sometimes the "mm" will be omitted in the descriptions. See the sections below on focal length and aperture to learn the meanings of these numbers.
In addition to the focal length and aperture, there may be additional information that is manufacturer-specific. This extra information can describe all sorts of things, like the quality of the glass used in the lens, whether it is auto-focus or not, whether there is some image-stabilization (Canon) or vibration-reduction (Nikon), whether the lenses are aspherical or not, and on, and on, and on. For a beginner, most of this is not important, and the best way to figure out what the additional parts of the description mean is to go to the websites of the individual manufacturer.
As an example, here's a complete description of a very nice Nikon lens: "Zoom Telephoto AF Zoom Nikkor 200-400mm f/4 G-AFS ED-IF VR (Vibration Reduction) Autofocus Lens", so there can be a lot of extra crud in the description, but the key part is this: "200-400mm f/4".
It's hard to say anything too specific about these lenses because some work better than others and if you're interested in purchasing such a lens, it's best to read its reviews compared to similar lenses by other manufacturers (including the lens made by the folks who built your camera body).
Generally, my experience is that you get what you pay for. If you've got a Canon body, the folks at Canon designing the Canon lenses know (or can find out) exactly how the Canon body works. The engineers at Tamron can't do this, so they've got to do some reverse engineering.
For my Nikon bodies, I almost always use Nikon lenses, and probably pay a bit more for them, but I'm more sure that they'll work well. I'm also a bit lazy about doing extensive research, and if you're willing to do the research, it can save you money from time to time.
Imagine cutting a rectangle out of a card, holding the card in front of you, and looking at the world through the hole. Imagine that your photo will be what you see through the hole. If the card is held close to your eye, you'll see a great deal, and this is what happens with lenses with short focal lengths, which are also called "wide-angle" lenses.
As you move the card away from your eye, this is equivalent to looking through lenses with longer and longer focal lengths, and when the card is quite far from your eye, you get a view similar to what you'll see through a telephoto lens.
Focal lengths are measured in millimeters, and the focal length has an exact physical meaning, but for now that mathematical meaning is not important. Generally, lenses with a focal length of around 50 to 55 mm are called "standard" lenses, lenses shorter than 35 mm are called "wide angle", and lenses longer than, say, 150 mm are called "telephoto". These are all approximate; there's no sudden cut-off. If you slowly move the card described above away from your eye, it's equivalent to zooming through the focal lengths from very short to very long. (This is slightly different with most digital SLRs. See Focal Length Multiplier for more information.)
Perhaps the easiest way to figure out what a suitable focal length might be, especially if you are interested in telephoto shots of wildlife that is far away, is to consider the angular coverage of the lens. Obviously, it makes no sense to ask, "How big a lens do I need to make a zebra fill the frame?" The answer depends on how far away the zebra is.
But you can ask, "How big a lens do I need to fill the frame with a zebra that is 2 meters high but is standing 50 meters away?" That's because once you know the height and the distance, you effectively know the angular size of the zebra. The same lens that would work for the zebra would also fill the frame for a 4 meter elephant 100 meters away or a 1 meter child who is 25 meters away.
To calculate the angle of the subject, divide the height of the subject by the distance to the subject. For the zebra—elephant&emdash;child example above, that will be 2/50 = 4/100 = 1/25 = .04. This number is, in fact, the tangent of the angle. For small numbers, the tangent of the angle is approximately equal to the angle in radians, so in this example, the angle would be about .04 radians. (If we really take the arctangent to get it exactly, the answer is .03998 radians, so the approximation is very good. For objects nearby, you do need to take the arctangent. If the object is one meter tall and one meter away, the tangent is 1/1 = 1, but the arctangent of 1 is 0.7854—quite a large error.) To convert radians to degrees, multiply by 180/π = 180/3.14159 = 57.2958, so in our zebra example, the angular height of the zebra (and the elephant and the child) is .04*57.2958 = 2.29 degrees.
Following is a table of the angular coverage for a few focal lengths. These apply only to 35 mm film cameras. See the following paragraph for digital SLRs. Notice that there is both a horizontal and a vertical angle, since 35 mm film is not square. The vertical angle will be larger than the horizontal one.
Warning: the information below is for standard 35mm film cameras. For digital SLR cameras there is a multiplier. See Focal Length Multiplier for more information.
| Focal Length (mm) | Horizontal View Angle (degrees) | Vertical View Angle (degrees) |
|---|---|---|
| 15 | 100 | 77 |
| 18 | 89 | 66 |
| 20 | 84 | 62 |
| 24 | 74 | 53 |
| 28 | 66 | 46 |
| 35 | 54 | 38 |
| 50 | 40 | 27 |
| 85 | 24 | 16 |
| 100 | 20 | 14 |
| 135 | 15 | 10 |
| 200 | 10 | 6.9 |
| 300 | 6 | 4.6 |
| 400 | 5.1 | 3.4 |
| 600 | 3.4 | 2.3 |
| 800 | 2.6 | 1.7 |
| 1000 | 2.1 | 1.4 |
| 1200 | 1.7 | 1.1 |
This focal length demonstration shows how the same scene looks through a series of different lenses mounted on a film SLR.
For example, on a digital Nikon with a 1.5x multiplier, if you put on a 100mm lens, you'd need to put a 100x1.5 = 150mm lens on a 35mm film camera to obtain the same view.
A lot of people figure that the best first lens to get with their new body is a zoom lens because it's "equivalent" to getting a whole bunch of different lenses. If your lens is a 35-105 mm zoom, it's equivalent to having every possible focal length between 35 mm and 105 mm. Or if you just get two lenses, get the 28-70 mm and the 70-210 mm, and you then have all the focal lengths between 28 and 210 mm. You can then shoot just about anything, right?
Wrong!
Here's my list of advantages and disadvantages of zoom lenses:
Surprisingly, in spite of what I said above, one of them gets heavy use. It's the 20-35 mm f/2.8. It's insanely expensive ($1500) which is why it lets in enough light, and I find the range from ultra-wide angle to wide angle useful. Normally, if you've got the wrong fixed-focal-length lens, you can take a few steps forward or back and get the right composition. With an ultra-wide view of El Capitan from Yosemite Valley, however, you may be talking about a thousand steps forward or back to cover the 20-35 range.
But unless you don't care about money, I do not recommend this particular zoom as one of your first lens purchases.
Also, since the above was first written (in about the year 2000), zoom lenses have gotten better. I now use a variety of them, especially on digital cameras that have a smaller pickup than standard 35mm film. (It is easier to design zoom lenses for the smaller digital sensors, so they are less expensive and work better.)
The physical size of the lens farthest from the camera body determines the maximum amount of light that can be let in, and there's no physical limit to how small the hole can be, but with tiny holes, bad things (like diffraction) begin to occur, so practically, there's both an upper and a lower limit to how big the aperture can be.
The aperture is listed as an "f-stop", and you'll see lenses described as "f/4", "f/1.4", et cetera. This is a little misleading -- when you buy an f/4 lens, that means that f/4 is the largest possible aperture for that lens. You can use the lens with smaller apertures by adjusting the aperture (or "f") control on the lens barrel or on the camera body.
It makes sense to label lenses this way, since the bigger the piece of glass on the front of the lens, the more light it will let in, and the easier it will be to use (and the more expensive it will be).
Zoom lenses descriptions often list a range of apertures. For example, a lens described as "35-135 mm f/3.5-4.5" means that it's a zoom lens capable of being used at focal lengths between 35 and 135 mm. At 35 mm, it is an f/3.5 lens, and at 135 mm it is an f/4.5 lens. In between 35 and 135 mm, it's maximum aperture will be between f/3.5 and f/4.5. It's possible (but more expensive) to build zoom lenses with a fixed maximum aperture. The "20-35 mm f/2.8" lens mentioned above has a maximum aperture of f/2.8 throughout its range.
On lens bodies, they are usually listed as a collection of numbers like this: 1.4, 2, 2.8, 4, 5.6, 8, 11, 16, 22, 32, 45. Usually the numbers you see are among those, but sometimes not.
As with the focal lengths, there is an exact physical meaning to the f numbers, but in almost all cases you'll be fine if you remember that smaller numbers mean bigger holes (more light), and that each time you go to the next larger number (from 4 to 5.6, or from 16 to 22, for example), the amount of light is cut in half. (If you have a slightly mathematical bent, it may help to notice that f-stops are typically written like this: "f/8". The "8" is in the denominator, and if you make the denominator smaller, the value gets bigger.)
This works really well when you consider the shutter speeds on your camera. In seconds, they are usually 1/4, 1/8, 1/15, 1/30, 1/60, 1/125, 1/250, ..., where each is almost exactly twice as fast as the one before. So if you've got the correct exposure, with some combination of f-stop and shutter speed, if you change the shutter speed to one step faster, you can preserve exactly the same exposure by changing to the next f-stop (and hence doubling the amount of light).
If you've got a lens with a maximum f-stop that's not in the standard series above (like, say, f/4.5), it just means that if you change from f/5.6 to f/4.5, you won't quite double the amount of light. (To double it, you'd have to go to f/4.)
The "f" notation is extremely useful because it works for lenses of all focal lengths in terms of the amount of light that gets to the film, so there's no difference in exposure if you're using a 300 mm f/4 lens or a 24 mm f/4 lens.
Keep in mind that a whole f-stop represents a lot of light -- it doubles it. So if you think that it's no big deal to go to a zoom lens because I will "only" lose an f-stop, be aware that you're losing a lot. People will pay big money for an f-stop: A good 300 mm f/4 lens costs about $1000 and an equally good 300 mm f/2.8 lens will cost $3000, and there's only a single f-stop of difference between the two.
Telephoto lenses are used to take photos of things that are far away.
Most of the bird photos you see in Audubon Magazine, for example, are
taken with a telephoto lens.
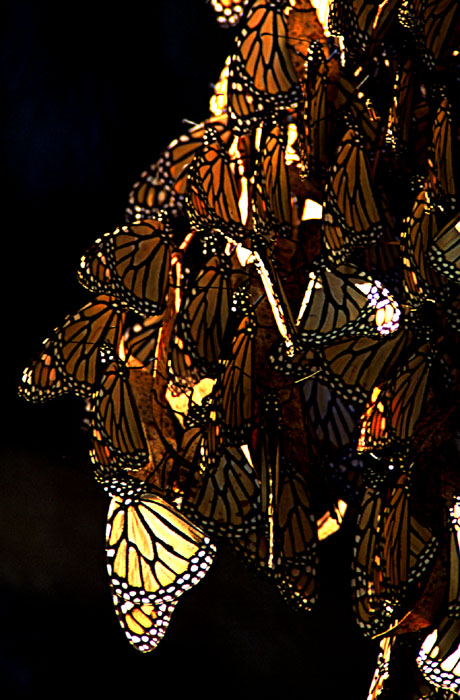
On the right is a photo of a tiny part of a huge collection of Monarch
butterflies that gather every year near Santa Cruz, California. I took
all my macro gear, thinking I would get some great closeup shots, but
tossed my big telephoto lens in the trunk almost as an afterthought.
The butterflies were well protected at the park, and it was against the
rules to get closer to them than about 20 feet. Most of the other
photographers were out of luck -- they had also brought only their macro
lenses -- but I had a big telephoto lens as well, and was able to get a
few nice shots.
These lenses tend to be big and long. In fact, they are sometimes called "long lenses", both because they are physically long and they have a large (long) focal length.
Using the analogy of the rectangular hole in a cardboard sheet discussed in the focal length section, for telephoto lenses, the cardboard is far from your eye.
It is very easy to make a telephoto lens, but it is very hard to make one that gathers a reasonable amount of light. Imagine that you are taking a shot of that tiny sparrow 30 feet away, and you want the sparrow to fill the frame. All the light that reaches your film has to come from that relatively tiny angular area around the sparrow, so to do a good job of light collection, you need a massive chunk of glass in front of your lens. This is not cheap.
For this reason, beware of inexpensive telephoto lenses. For a couple hundred dollars, you can get an 800 mm f/16 lens, while an 800 mm f/5.6 lens will probably cost $8000. The reason is that the cheap lens is "only" 3 stops slower. 3 stops translates to 8 times less light. It will be almost impossible to focus since your viewfinder will be so dark. In fact, most auto-focus systems can't work at apertures smaller than f/5.6 maximum aperture. Since there's so much less light, you'll need to expose for 8 times as long, so if your subject is moving, you'll get an image that's blurred by 8 times as much, even if you manage to focus correctly.
With big lenses, you'll need a tripod. The bigger the lens, the bigger the tripod. I never shoot anything that's 300 mm or longer without a tripod, and even at 200 mm, a tripod is usually a good idea.
Hell, it's always a good idea to use a tripod, but it's a less bad idea not to use a tripod with shorter focal lengths.
Some (expensive) modern lenses have so-called "image stabilization" that can alter the limits above. See the section on image stabilization at the end of this page.
There's a nice rule of thumb that states that if you're hand-holding a lens, the shutter speed should always be faster than 1 divided by the focal length in millimeters. So for a 200 mm lens, be sure the shutter speed is faster than 1/200 of a second. With image-stabilized lenses you can do much better.
I think this rule of thumb applies to youngsters whose hands don't shake yet. I try to shoot at twice that speed.
The longer the lens, the harder it is for the auto-focus mechanism to work. Part of this is just due to the reduced amount of light available with large lenses, but there are other reasons as well. Thus, don't be surprised if you have to do a lot of manual focus work with your very large lenses.
Nothing comes for free, however, and the price you pay is one stop of light for the 1.4x and two stops for the 2x. So as a concrete example, if you begin with a 300 mm f/4 lens, if you add a 1.4x extender, it will be equivalent to a 420 mm f/5.6 lens. With the 2x extender, it will be equivalent to a 600 mm f/8 lens, and it probably won't auto-focus any more.
In addition to the light loss, there has to be a quality loss as well -- after all, the light now has to travel through all the optics of the tele-extender in addition to the optics of the original lens.
For some models of cameras and lenses, the tele-extenders will allow auto-focus, but in most cases your lens will (at least effectively) become a manual-focus lens. The reason is that even if the tele-extender does pass though the information and linkages to the camera to allow auto-focus to occur, there's so much light loss that the camera can't auto-focus anyway. Remember that auto-focus has a hard time working with any lens having an aperture smaller than f/5.6.
Some manufacturers (Nikon, for example) make tele-extenders that are tuned to particular lenses. One type is used for lenses with a focal length less than 300 mm and a different type for lenses 300 mm or larger. Third party extenders are designed to work with a variety of lenses, so, as compromises, they may not work as well.
Point-and-shoots will probably come with a standard lens. If you purchase a kit that includes a body and a lens, the lens will probably be standard. They're generally good for taking "normal" looking shots of people, and since that accounts for a large percentage of the photos that are taken, it's not a bad type of lens to have.
In addition, it's technically not too hard to make a high quality lens in this range, so lenses with a standard focal length will be cheaper than "comparable" lenses with longer and shorter focal lengths. The last time I checked, the Nikon 50 mm f/1.8 lens cost about $90, and after you buy your first $1000 lens, a $90 lens seems basically free.
There's no absolute definition of what a standard lens is, but typically they have focal lengths between 35 and 100 mm. Lenses of 75 or 80 mm are often called "portrait lenses" because they are useful for taking portraits of people's heads without too much distortion.
As I recommended earlier, if you're thinking of getting a standard lens, consider a macro lens (see next section). They're more expensive, but they usually work fine as regular lenses (and sometimes even better). They also typically let in less light (f/2.8 instead of f/1.8 or f/1.4), so in that sense they're harder to use. They're also going to be heavier to lug around.
But they have that magical "macro" ability to take photos of tiny things that I love. When I'm going out on an expedition where photography is not the main goal, but I decide to take along a camera with a single lens just for fun, I almost always take the 60 mm macro lens.
Macro lenses are used to take close-up photos of things. There are lots of ways to do close-up photography without a macro lens, but if you can afford the extra bucks for a macro lens, I think it's by far the easiest way to go.
For some reason, Nikon calls all its macro lenses "micro", but as far as I know, all the other manufacturers call them "macro" lenses. (Nikon has some "perfectly reasonable" reason for calling its lenses "micro". Unfortunately, I've read the rationale over and over, and still can't remember what it is.)
Basically, a macro lens lets you focus on objects that are very close to the camera. In theory, a perfect lens would focus on objects at all possible distances from the camera, but in practice, lenses are optimized to have good performance for a certain range of distances. (As you know, in theory, theory works as well as practice, but in practice, it doesn't.) Macro lenses are designed to work well when the subjects are very close to the camera.
The main price you pay (in addition to the dollars and the fact that they weigh more than standard lenses) is that macro lenses typically don't let in as much light. For a couple of hundred dollars, you can get a great standard 50 mm lens with an f/1.4 aperture. A $400 60 mm macro (Nikon "micro") has a maximum aperture of f/2.8. The standard lens lets in 4 times as much light.
Macro lenses also tend to be heavier than the corresponding standard lenses, and you'd think that because they're optimized for close-up photos, they would not work well for objects far from the camera. My experience with Nikon macros is that they are great as standard lenses.
The power of a macro lens is usually measured not in terms of how close to the subject it can focus, but on its magnification. A 1:1 macro produces an image that is exactly as big on the film as the object. In other words, if you photograph a bug that's 1 cm long and then you look at your slide, the image of the bug on the slide will be exactly 1 cm long at 1:1 magnification. 1:2 magnification means that the image is only half the size of the object, and so on.
1:1 (life-size) magnification is very good. Remember that if your butterfly fills the frame, it will fill the whole photo when you blow it up to 8x12 inches. Most modern high-quality macro lenses go to 1:1, and very few go beyond that.
To get higher magnification, you'll need some special (sometimes expensive) stuff, and above about 2:1 (twice as big as life-size), things start to get really tricky.
The main problem is that the closer an object gets to the lens, the small the "depth of field" gets, so the harder it is to get everything you want in focus. To get high magnification, you'll find yourself using bellows, extension tubes, arrays of flashes, heavy tripods, focusing rails, and all manner of other junk. It's lots of fun (and can be really expensive), but it can be tricky, and if you're just starting out, you'll be overjoyed with what a 1:1 macro lens can do.
Some macro lenses have another feature that may be of interest, and that is that they are "flat-field". An ideal lens will focus a flat plane through the world onto the flat piece of film, but real lenses vary from this somewhat. For photos of people or nature or most things, it doesn't much matter, but if you're photographing pages of books, paintings, coins, or other naturally flat objects, it's a real bummer if only the center of the page is in exact focus and the margins are blurred. A flat-field lens (and these are almost exclusively macro lenses) is optimized to focus flat objects onto the flat film as well as possible. Not even all macro lenses have this property.
If you're thinking of getting a wide-angle lens, be sure to take a look through a 24 mm and a 20 mm lens at the camera shop. I think the 24 mm produces shots that are interesting because they're wider than the "normal" 28 mm. The 20 mm lens produces views that are quite striking, but because they are so wide-angle, you may find them to look a little strange.
If you want a "realistic" look at a photo, the obvious thing to do is to hold the photo at a distance so that the angle the photo makes with your eye is roughly the same as the viewing angle from the camera. If you've got a 4x6 inch print, and you hold it at a normal viewing distance, it looks normal. If the photo is shot with a 20 mm lens, it will look strange when you hold it at a normal viewing distance because it shows a much wider angle of coverage than you "expect" to see in a 4x6 rectangle at that distance. But if you hold it 3 inches from your eye, it will look correct (assuming you can focus your eyes that close).
In any case, be sure to look at the extremes before you select a wide-angle lens -- you may not like them, but at least you'll know what you're missing.
There are shorter focal-length lenses than 20 mm, but if they're "rectilinear" (not fish-eye), they will be insanely expensive. If you take a picture with straight lines in it using a "rectilinear" lens, those lines will be straight on the film. With a fish-eye, only straight lines passing through the center of the film remain straight; all the others are bent into curves. It's an interesting effect, but often it's not what you want.
There are a couple of things to watch out for when you use wide angle lenses, and the wider the angle (the shorter the focal length), the more care you'll have to take.
Vignetting is what happens when the image in the center of a photo is better than on the edges. It can be caused if any of the light is blocked on the edges. With wide-angle lenses, it's easy to get vignetting if you use filters because the small width of a filter can get in the way if the field of view is large enough. If you use the wrong hood on a wide-angle lens, you're practically begging for vignetting problems.
 Flare
is those weird spots of light that sometimes wash across the
photo, usually in a straight line pointing to where the sun was
when you snapped the picture. The spots often have the same
shape as the aperture diaphragm on your camera -- 5 or 6-sided
polygons with strange colors. Flare occurs when light enters the
front of the lens at a steep angle and bounces around inside in
ways the lens designers never imagined. Sometimes it can be
artistic, but if you don't want it, it can foul up a good shot,
and you may not be able to tell that you're going to get flare by
looking through the viewfinder. Just beware of pointing the
camera too close to the sun. Even if the sun is slightly out of
the frame, you can still get a powerful flare effect. Wide-angle
lenses are more susceptible to flare since they have a much wider
field of view, and hence a higher probability of getting junk you
don't want in the photo.
Flare
is those weird spots of light that sometimes wash across the
photo, usually in a straight line pointing to where the sun was
when you snapped the picture. The spots often have the same
shape as the aperture diaphragm on your camera -- 5 or 6-sided
polygons with strange colors. Flare occurs when light enters the
front of the lens at a steep angle and bounces around inside in
ways the lens designers never imagined. Sometimes it can be
artistic, but if you don't want it, it can foul up a good shot,
and you may not be able to tell that you're going to get flare by
looking through the viewfinder. Just beware of pointing the
camera too close to the sun. Even if the sun is slightly out of
the frame, you can still get a powerful flare effect. Wide-angle
lenses are more susceptible to flare since they have a much wider
field of view, and hence a higher probability of getting junk you
don't want in the photo.
I took a bunch of photos of the Rodin sculpture on the right to
get the right amount of flare. I like what I got; you may not.
Finally, be careful of using polarizing filters on wide-angle lenses for two reasons. First, they tend to be thicker than normal filters and are more likely to cause vignetting (although some lens manufacturers make special (expensive) polarizing filters specially made for their wide-angle lenses). Second, if you've got a lot of blue sky in your photo and a wide angle lens, the polarization of the light in the sky varies with its angle from the sun, so you may find that your beautiful uniformly blue sky shows up in your photo as a sky that changes from light blue to dark blue across the width of the picture.
Two typical fish-eye focal lengths are 16 mm and 8 mm. A 16 mm fish-eye shoots a photo that is 180 degrees from corner to corner of your photo. Although there's distortion, if you're careful to keep things like the horizon going through the center of the photo, the distortion may not appear too bad. Sometimes you want distortion, however, and with a fish-eye, it's easy to do.
The 8 mm fish-eye is weird. It shoots an entire hemisphere, and prints it as a circle in the center of your photo. There's a circular area of image, and the rest of the photo is black. It's really easy to get yourself or your tripod in such photos.
If money is no object, for around $12000 you can special-order a 6 mm fish-eye from Nikon that shows more than a hemisphere. In fact, if the hemisphere is 180 degrees, the 6 mm lens goes to 220 degrees.
Fisheyes are very useful for shooting in very cramped places -- airplane cockpits and things like that. I've gotten a lot of pretty good shots in the jungle with a mild (16 mm fish-eye). In the jungle, all the plants are pretty twisted and bent anyway, and a little more distortion isn't really obvious.
With tilt, you can make it so that the focus plane is not perpendicular to the film plane. This is great for such things as taking a photo of wildflowers that go up a slope in front of you when you want all the flowers to be in focus, but it's rare to do on a 35 mm camera. Usually photographers who are trying to do this sort of thing use the giant "large-format" cameras with 4x5 inch (or 8x10 inch) film.
I have completely fallen in love with these lenses. I happen to use Nikon equipment, and Nikon now supplies a bunch of "VR" lenses. The "VR" means "Vibration Reduction", and it works like "image stabilization" on other cameras. I find that when the VR is turned on, it can give you up to three stops of extra speed, which is amazing! That's 8 times the speed! If you want to take a look at a photo I stitched together from 4 shots taken at full frame rate, hand-held at about 300mm from a moving boat (with VR, of course), check out the picture of a hawk taking a piranha out of a river. Without VR, this would never have been possible.
Return to the beginner's guide.
Want to send me mail? Click: ( tomrdavis@earthlink.net)