Accessories for 35 Millimeter SLR Camera Equipment
Tom
Davis Tom's home page
Last modified: March 20, 2000.
To start taking photos, all you really need is a camera body, a lens,
and some film. Depending on what sorts of photos you plan to take,
you'll find that other pieces of equipment may be very useful.
I've arranged the topics in the order I would find most valuable, but
your mileage may vary. Here's an index to the topics:
Film
Film is, of course, very important. I would start learning with slide
(transparency) film. For all the details you should know about film,
take a look at the film page.
Electronic Flash
If you're going to shoot any color photos indoors, you're going to need a
flash, so this is probably the accessory that most people get first.
Some cameras even have a built-in flash which can be convenient, but the
disadvantage is that it will probably not be very powerful, and it will
go through your batteries pretty fast. On cameras with the expensive
lithium batteries, this can be pretty annoying.
Even if you've got a lot of bright lights in your house and you're using
fast film and the camera says that the exposure will be OK, you'll
probably be unhappy with photos taken this way because most film you buy
is called "daylight" film, and is designed to be shot using light from
the sun. If you shoot using indoor (tungsten) light and daylight film,
your photos will come out very yellow. (Or if your house is lit using
fluorescent light, they'll be green.)
It is possible to buy film designed for tungsten light, but it's
typically designed for the tungsten flood lights that would be used in a
professional photographer's studio which have a higher color temperature
than the ones in your house. You can also correct for the yellow color
of your tungsten lights with the right shade of blue filter, but this
will cut out even more light (or with a magenta filter to compensate for
the green of fluorescent bulbs). Your best bet is to use a flash that
totally overpowers the ambient light with the daylight-balanced light
from a xenon flash tube.
Depending on how much the camera "knows" about the flash and the flash
about the camera, some very sophisticated things are possible nowadays,
but, as with many things, you'll find that you'll have to pay money for
the extra sophistication.
Very simple flashes will simply fire a flash when the shutter is open,
so it is up to you to figure out how much light is going to come back as
a result of the flash and to adjust the aperture accordingly. Subjects
further away reflect less light, for example.
Some flashes can determine the distance to the subject by "asking" the
camera what distance it's focused at, and using that information to
guess the proper aperture.
The most interesting flashes use "TTL", or "Through The Lens" control.
There's a photo sensor inside the camera that's looking at the light
reflected from the film, and when the right amount of light for a
correct exposure has been received, the flash "quenches", or shuts off.
So if 1/3 of a full-power flash gives correct exposure, that's exactly
what you'll get.
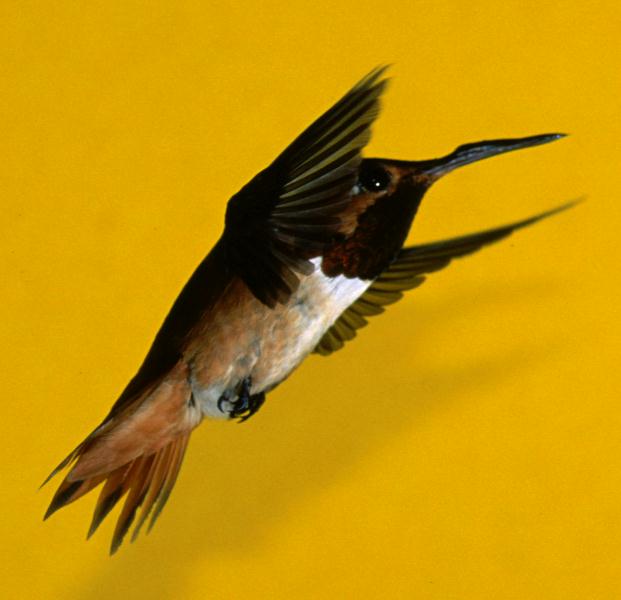
 On the right is a photo of a Rufous Hummingbird taken
using the TTL flash. Quite often, the first time you try this,
you'll get a bad photo -- the subject is completely over-exposed
and the background is totally black. What has happened is that
the camera is waiting until there's enough light to get a
proper exposure, and since the bird is so close to the lens,
all the light will come from the bird. To get what the camera
thinks of as proper exposure, and since nothing is coming from the
background, the flash keeps going until there's enough light from
the bird, but this is balancing out the pure black background, so
the bird is overexposed.
On the right is a photo of a Rufous Hummingbird taken
using the TTL flash. Quite often, the first time you try this,
you'll get a bad photo -- the subject is completely over-exposed
and the background is totally black. What has happened is that
the camera is waiting until there's enough light to get a
proper exposure, and since the bird is so close to the lens,
all the light will come from the bird. To get what the camera
thinks of as proper exposure, and since nothing is coming from the
background, the flash keeps going until there's enough light from
the bird, but this is balancing out the pure black background, so
the bird is overexposed.
There are a couple of things you can do about this. You can
use a spot meter, so only the center of the frame is properly
exposed, and presumably, that contains the bird, or you can
put a background relatively close so that light from the flash
is also being reflected by the background. That's what I did
here. I just used a yellow sheet of paper; for an artistic
shot, it would be better to put some "natural" greenery close
behind the bird. (The hummingbird feeder is just outside the
shot, of course.)
Flashes may also have the capability of doing "fill flash". If your
subjects are people and the background is bright, the "proper" exposure
may show the people as silhouettes, but with a little fill-in flash, the
faces are brightened. In such cases, sunlight provides most of the
light, but a little fill flash brightens up things near the camera.
Red-eye Reduction
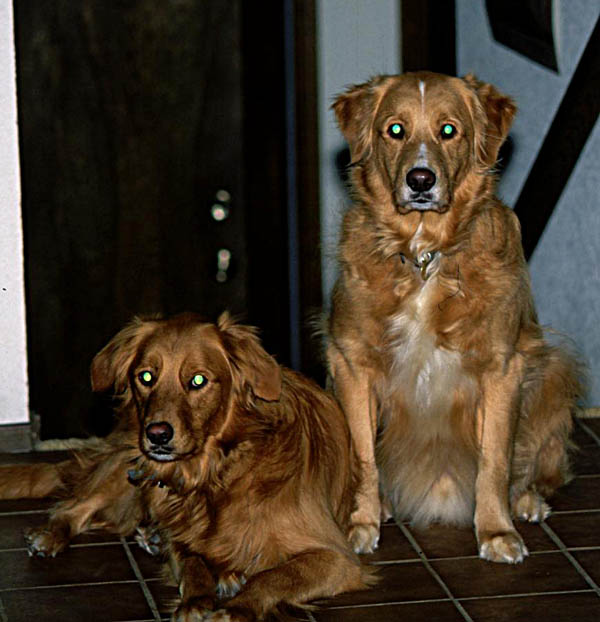
 Some flashes provide so-called "red-eye reduction". A lot of flash
photos of people (especially in dark rooms) show the pupils of their
eyes as a bright orange-red, sort of like they're demons. (For some
reason, dogs are different, and show bright green pupils -- well, at
least my dogs do. On the left is photo of them having just committed
the heinous crime of chewing up all the newspaper on the recycling heap
and spreading it uniformly around the house. The "demon dogs" shot
shows the puppies with bright green demon eyes standing behind
their handiwork.)
Some flashes provide so-called "red-eye reduction". A lot of flash
photos of people (especially in dark rooms) show the pupils of their
eyes as a bright orange-red, sort of like they're demons. (For some
reason, dogs are different, and show bright green pupils -- well, at
least my dogs do. On the left is photo of them having just committed
the heinous crime of chewing up all the newspaper on the recycling heap
and spreading it uniformly around the house. The "demon dogs" shot
shows the puppies with bright green demon eyes standing behind
their handiwork.)
Red-eye reduction works by pre-flashing (at relatively low power, but
possibly with three or four flashes) just before the real shot and flash
occurs. Red eye is caused because the flash typically comes from very
near the camera, goes through the pupil, is scattered by the orange-red
retina, and is refocused at the camera by the eye's lens. In dark
rooms, the pupil is especially wide open, so a lot of light is scattered
by the retina. The pre-flash causes the eye's iris to close down to
make a much tinier pupil which can greatly reduce the amount of red
light coming back.
I don't like red-eye reduction because it's really annoying to the
people being photographed, and since you have to wait for all the
pre-flashing to occur before the actual photo is taken, the actual photo
occurs a few tenths of a second after you trip the shutter, not
immediately afterward, so you never know quite what you got until the
film comes back from the developer.
I think a better solution to the red-eye problem is to take the flash
away from the camera. The problem is caused because the source of the
light is usually very near the lens. If you can hold the flash a few
feet from the camera, the problem usually goes away, and the photo is
usually a bit better too, because the light doesn't come from head-on,
but rather slightly from the side so there are some small shadows that
make things look a bit more natural. To take the flash off the camera
you need a flash extension cord. One end plugs into the flash "hot
shoe" on the camera, and the flash plugs into the other end. The cord
is 3 or 4 feet long so you can hold the flash off to either side (or
above or below, although those usually make weirder-looking shots due
to the strange shadows, especially below) when you take the photo.
Projection Flash
When you're trying to use flash with a telephoto lens, you find that the
power of the flash drops off rapidly (as the inverse square power, for
all you physics nerds), and it's not suitable for stuff that's too far
away. You can, however, purchase fresnel lenses that attach to the
flash and refocus the beam into a much tighter beam. They're not too
expensive (perhaps $30 or $40?) and they can help a lot when you're
trying to shoot little tiny birds 'way up in the rainforest canopy.
Tripods
If you're a human, you can't hold your camera steady.
Obviously, if the shutter speed is fast enough, it doesn't matter if the
camera moves a little bit while the shutter is open because the blur
caused by this movement is very small. But if you want to eliminate
blur, the steadier the camera is the better you'll do.
The rule of thumb that tells you how fast the shutter
speed has to be to hand-hold a lens of a given focal length is that it
should always be faster than 1/L in seconds, where L is the focal length
of the lens. In other words, if you have a 100 mm lens, you'd better
shoot at 1/100 second (or faster) to avoid blur.
I personally think this is the best case. If you're old and not quite
so steady as you used to be, the speed should be higher. If the lens is
so heavy that there's a real strain in holding it up, you need a higher
speed, and so on.
Of course if you have one of those image-stabilized lenses (Canon
currently sells them) you can do a lot better. I have no personal
experience with these lenses, however.
If you use long (telephoto) lenses, you almost certainly need a tripod.
I try always to use a tripod if I'm shooting lenses 200 mm or longer.
I wrote an article on tripods for very long lenses on Philip Greenspun's
photo.net pages: Tripods, Heads, and
Quick Releases. This is probably more than you want to know, so
a short version follows.
I'll also spare you the sad story of my
rather large tripod family, unless you really want to read it.
The basic rule is that the heavier the tripod, the better. I once was
told by a professional photographer friend that to make a perfect
tripod, just weld your camera body to a steel box the size of a piano
case and then fill it with rocks. The heavier the tripod, the less it
will shake.
The movement problem becomes larger as the focal length of the lenses
becomes larger. Not only do the lenses get heavier and harder to
support, but a tiny jiggle on a large lens amounts to a much larger
movement relative to the size of the film than the same jiggle on a
small lens.
If you know you're never going to use large lenses, you can get away
with a smaller tripod. I've got experience with both Bogen and Gitzo
tripods and I've generally been happy with both, given the price. If
price is no object, get the Gitzo.
There are a large variety of tripods, and if you can find a camera store
with a whole bunch of different models, you can play around with a lot
of them and see what you like and what you don't.
Another trade-off you're going to face is how many leg segments the
tripod has. The more of these, the less stable the tripod is going to
be, but the smaller it will be folded up.
Finally, a lot of tripods have a center post that you can use to raise
the camera a bit. I don't recommend using these -- you're down to one
leg again. It's almost best just to get a tripod that doesn't have one,
but I confess to using mine a couple of times when the tripod without it
was not quite tall enough to get the lens over the top of a fence, and
it was either use the center extension or miss the shot.
As important as the tripod is the tripod head you have. It's got to
connect the tripod to camera solidly, with as little play as possible.
If you're in a shop with tripods and heads, it's good to try hooking a
camera to the head, and then seeing how much wiggle you can get.
There are two basic types of heads -- ball heads and pan-and-tilt heads.
I prefer the ball heads because if you release one knob, the camera
movement is completely free, and you can lock it up again with a single
knob. For wildlife, this is great.
On the other hand, if you're doing other sorts of shooting, and you've
got the height right, but need to make a minor adjustment in
side-to-side position, the pan-and-tilt head will let you do exactly
that. Each degree of freedom has it's own control. (To be fair, some
ball heads have a separate control for panning without releasing the
ball head.)
Camera Bags/Backpacks
Unless you're planning to do only studio shots, you're going to want to
lug your stuff around. There is an enormous variety of bags, and backpacks
built to carry camera gear. I've tried a wide variety, and there are
pros and cons of each.
With one camera and one lens, there's usually no problem, but as soon as
you get that second lens you're going to have to worry about how to
carry it. Cameras and lenses are not terribly delicate (assuming you've
got your lens caps on), but you don't want to bash them around, either.
Most bags and backpacks designed for carrying photographic equipment
have padded interiors, designed so that you can adjust the shapes of the
compartments to fit the particular camera bodies, lenses, and other
stuff that you've got. They usually have places to put film, lens
cleaner paper, cable releases, filters, and so on.
The main recommendation I would make is to get something that's at least
a little bigger than you think you need. I've never been very good at
predicting the next thing I'm going to buy, and it's especially likely
when you just get started that you'll make two or three additional trips
to the photo store to get a couple of things you discover you need. If
you buy a bag at the same time you buy your first camera and lens and
teh bag is exactly large enough to hold what you bought and no more, I
can almost guarantee you'll be sorry.
I think the best thing to do is to work with some makeshift bag for a
month or two, and then when things settle down to a stable kit, you'll
be in a better position to get the right thing.
If you get hooked on photography, you'll probably want at least a couple
of different bags. I have one by Tamrac that can be converted into a
backpack or the straps can be folded and zipped into a pocket that makes
it into a great carry-on bag on an airplane. It's about as large as it
can be and still fit under an airline seat.
I also have a little "butt pack" that holds a camera, a couple of
lenses, and some film that I use when I don't want to haul the whole
load around with me, and I have one of those "photo vests" that has a
million pockets that's also sometimes useful. You just have to remember
what pocket everything is in. The vest, of course, is not as well
padded as the bags. The guy who sold me the vest says that it's much
better than a standard camera bag because when you get caught taking
photos that you're not supposed to be taking, you can run much faster
with a vest than a camera bag!
Filters
Filters are usually attached to the front of your lens to alter the
properties of the light that reaches the film. Here are a few of the
more common types of filters:
The most common type of filter is simply screwed on to the front of the
lens, but there are other sorts. Some systems have a filter carrier
that hooks to the front of the lens and allows you to put different
rectangular filters in it. The advantage is that you can use the same
filters on different-sized lenses.
Most camera systems try to make their lenses use only a few filter
sizes. For example, in the Nikon system, most of the standard lenses
use filters that are either 52 or 62 millimeters in diameter. The
oddball large lenses, of course, will use larger filters.
You can purchase step-up rings that let you attach large filters to
smaller lenses. I own (for my Nikon system) a 52 to 62 mm step-up
filter, so I just buy 62 mm filters (except for UV protection filters, see below). Step-down rings exist
too, but don't do this or you'll almost surely wind up with vignetting
problems (see vignetting, below).
Buy a filter that's comparable in quality to your lens. It's nuts to
spend a zillion dollars on the fanciest lens with triple-coated optics
and the fanciest ED glass and then put a filter in front of it that's a
piece of crap. All the light that reaches your film goes through the
glass in that filter (or plastic in that filter, if it's a piece of
crap). Similarly, why spend $100 on the finest B+W filter for a $70
lens? There are some exceptions, of course. For filters that do some
wack-o distortion of their own that you're going to use only rarely, why
bother with high-quality optics if the purpose of the filter is to
distort it anyway?
I like the Nikon and B+W filters. I find Hoya and Tiffen to be
slightly lower quality, but pretty good. The Nikon filters are thinner,
and I get them when vignetting may be a problem.
This almost always means that I've got a really wide-angle lens.
Vignetting
Vignetting is when the center of your image is brighter than the edges
because something is blocking the light that would have reached the
edges. Normally, lenses are designed to avoid vignetting by ensuring
that the same amount of light arrives at all parts of the film,
independent of the angle of arrival. It's impossible to do this
perfectly, but modern lenses do pretty well. The wider the angle of the
lens, the harder it is to get this right, since with wide-angle lenses,
a much wider range of incoming angles must be handled.
But if you start putting on filters, you may have trouble. Although
they are fairly thin, when you screw on a filter, it is like adding
a little cylinder to the end of your lens. Imagine the limiting case --
shooting through a hollow pipe. In that case, you'd expect to see a
circular image in the center of your film, and blak everywhere else,
right?
So imagine cutting off the pipe to make it shorter and shorter and
consider what the photos would look like. The shorter the pipe is, the
more you'll see, and when it's finally cut down to nothing, you'll see
everything. As the pipe gets longer and longer, at some point, it will
begin to interfere with the image, at first in a minor way, and then
more and more seriously. With a wide-angle lens, the problem will occur
much sooner.
On ultra-wide-angle lenses, even a single filter can cause vignetting,
so on my 20 mm lens, I use the thin Nikon filter instead of the fatter
B+W filter if I can.
If you decide that the effect you want can only be achieved with two
different filters -- you want to add a reddish tinge and use a polarizer
to cut glare, for example -- then you can "stack" the filters by
screwing the polarizer in front of the reddish filter, and you'll get
the effect you want, but you'll also run a larger risk of vignetting,
since the "pipe" in front of your lens is twice as long.
If you normally use a filter for protection (see the next section),
don't get lazy and just stack on another filter if you want some special
effect. Take off the protection, put on the new filter, and avoid
vignetting problems.
Another thing to beware of is mixing filters and lens hoods. Often
the hoods are designed to be as big as possible and yet avoid
vignetting. But if you put on a filter plus a hood, some vignetting may
occur.
Protection
There are 2 different religions on the question of whether it's a good
idea to keep a transparent filter on the lenses at all times to protect
the lens. Some people do it, and others think that it's a wasted
expense, and since any filter, no matter how good, will degrade the
light somewhat, it's best to leave them off. Of course, if you normally
belong to this second religion and you're shooting at the ocean with
tons of salt spray, or if you're on an African safari where tons of dust
is being constantly being kicked up by your jeeps, you put on a filter.
Maybe the best way to state the dogma of this religion is that filters
are normally off the lens, and when you put one on, it's for a good
reason.
I was a casual member of the first religion until I had an experience
that converted me for life. Now I'm a fanatical user of filters for
protection. I've also seen a couple of other folks drop cameras and
smash their filter but save the lens, so my personal experience
indicates that it's a good idea.
Sometimes, of course, I remove the protection filter for a particular
shot when I want to be sure to minimize distortion, but then I put it
back on when I finish the shot.
Two filters are typically used for protection -- a so-called "skylight"
filter and a UV filter. I prefer the UV filter, since it is as close to
neutral as possible. The skylight filter has a slight pinkish tinge
that helps in some hazy situations and doesn't hurt in most others, but
I prefer neutrality by default, and I carry a skylight filter if that's
the effect I want.
Colored Filters
There are dozens of different colored filters used for all sorts of
effects. Right up front I'll tell you that if you're shooting black
and white film it's critical to know how to use strongly colored
filters, and I'm not an expert in that area -- I almost never shoot
black and white. If that's what you do, find a book or ask an expert;
I'm certain to lead you astray.
For a long time, I found it hard to think about color filters, but I now
have a way that works for me. Your mileage may vary.
Colored filters can only remove light from a scene; they can't
add anything. If you look through a red filter, everything seems
reddish not because the filter is adding red; it's because the filter is
blocking the non-reds.
So if you're shooting indoors with film that's meant to be used
outdoors, the problem is that the tungsten light indoors is more yellow
than what the sun puts out (assuming you have tungsten rather than
fluorescent lighting). So to make the picture seem normal, you need to
block some of the yellow. A yellow filter is totally wrong -- it blocks
everything but yellow. You want a blue filter, with the shade
of blue corresponding to the amount of yellow your tungsten bulbs are
putting out.
Similarly, if you're shooting film that's designed to work well with
tungsten light outdoors, it is less sensitive to yellow (because there
will be extra yellow that it needs to ignore), so if you're shooting
that film outdoors, you need more yellow. But filters can't add color,
so you do it by reducing the amount of everything else, and that's
exactly what a yellowish filter will do.
You get the idea.
This approach makes it easy to know how to stack filters (although I
just told you not to do it in the last section, didn't I?)
Anyway, if you're planning to use the wrong film (indoor film outdoors,
or outdoor film indoors), just look up in the filter tables to find out
what to use. I think it's easier just to use the right film. I simply
always use daylight film, and if I'm indoors, I use a powerful flash
which puts out light that's like sunlight. You will notice that folks
who take color shots indoors without a flash using daylight film tend
to wind up with yellowish pictures because of the yellow tungsten light.
Fluorescent light is actually green, and a magenta filter will let
through everything but green if you're shooting daylight film in
fluorescent light without a flash.
Other than these filters to correct for using the wrong film, there
aren't too many colored filters used by photographers using colored
film, but there are a couple.
Warming filters (81A, 81B, and sometimes even 81C) are sort of tan, and
warm up your subjects, particularly during the middle of the day with a
cloudless sky. 81A provides a tiny bit of warming, 81B a significant
amount, and 81C, almost too much.
What's going on is that if there's a lot of blue sky, the light falling
on your subjects comes mostly from the sun, but a significant amount is
sunlight bouncing off the blue sky and then on your subject. Thus the
subject will have too much blue light on it, and will appear a bit
bluish. To correct for this, these warming filters block out some of
the blue-sky blue.
Some people cheat and use reddish or tobacco-colored filters to make
sunsets appear better than they are. The 81A, 81B, and 81C will do
some of this as well.
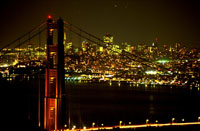 Sometimes, if you're making extremely long exposures
(night shots of a city, like the one on the right of San Francisco
behind the Golden Gate Bridge, for example), you start getting funny
colors because of what's called "reciprocity failure" of your film.
At your photo shop you can get the technical information about any
type of film that will tell you how to correct for this. For example,
the information might say something like, "If your shutter is open for
more than 2 seconds, use such-and-such a magenta filter. If it's open
for more than 10 seconds, use this type." and so on.
Sometimes, if you're making extremely long exposures
(night shots of a city, like the one on the right of San Francisco
behind the Golden Gate Bridge, for example), you start getting funny
colors because of what's called "reciprocity failure" of your film.
At your photo shop you can get the technical information about any
type of film that will tell you how to correct for this. For example,
the information might say something like, "If your shutter is open for
more than 2 seconds, use such-and-such a magenta filter. If it's open
for more than 10 seconds, use this type." and so on.
Don't worry about this unless you're doing really long exposures. In
fact, you'll surely forget you read this, and someday you'll take a roll
of great photos of the Golden Gate bridge at night with San Francisco
behind it using 20 second exposures, and when you get the film back from
the lab, you'll suddenly remember about reciprocity failure! At least
I learned in San Francisco; you may learn about it somewhere else.
Polarizing Filters
Polarizing filters are very useful. If I could only carry one filter,
it's the one I'd probably pick. Here is the executive discussion of
polarizing filters. For more information than you could possibly want,
click here.
Use a polarizing filter to get rid of glare from glass or off water.
You can also use it to darken a blue sky since the light coming from it
tends to be polarized.
All polarizing filters allow you to turn the polarizing element to
adjust for the angle of polarization of the incoming light, so turn it
around while you're looking through the viewfinder to get the effect you
want.
If you have a camera with automatic exposure calculations, use a
circular polarizer. For totally manual cameras, a linear polarizer
works fine and is a lot cheaper.
Neutral-density Filters
Neutral density filters are a uniform gray color -- they do not cut out
any frequencies of light more than any others. The net effect of adding
such a filter is the same as slowing down your film speed. In other
words, if you are shooting ISO 400 film and you put on a 2-stop neutral
density filter, the result is the same as if you were shooting ISO 100
film (100 to 200 is one stop, and 200 to 400 is another).
Usually your problem is to get enough light -- that's why you pay the
big bucks for lenses with lots of glass area in front -- but there are
a few cases where you want less. For example, if your camera is already
loaded with ISO 800 film and it is a very sunny day and your
lens only stops down to f/16, you're certain to over-expose your film.
But if you put on a 2-stop neutral density filter, it's the same as
changing your film to ISO 200, which you may be able to handle.
A very interesting effect I once saw required something like a
13-stop neutral density filter, which reduces the amount of light
by a factor of 8192 or so. In other words, the exposure had to
be 8192 times as long. To take a shot required a long (half-hour)
exposure. The photo I saw was taken in a busy train station
where there are always hundreds of people milling about. But
since the shutter was open for a half hour, nobody was in the
frame long enough to make an image on the film, and the resulting
photo looked like an empty station, perhaps with a bum asleep on
a bench. The bum shows up because he is in the same place for
the entire half-hour exposure.
Split-intensity filters
Split-intensity filters have half of the filter one color and the other
half another. Usually one of the colors is transparent, and the other
is a uniform gray (in other words, just a neutral-density filter on
the other half).
They are very useful if the sky is bright and you want detail in both
the sky and on the ground. Without a split-density filter, you either
over-expose the sky (so it will all look white), or you'll under-expose
the earth (and it will look completely black). But if you mount a
split-intensity, 2-stop neutral-density filter and rotate it so that the dark
half is on top, and compose your frame so that the edge of the filter
runs along the earth/sky border as much as possible, then the light from
the sky will be reduced by two stops and it will be much easier to get
both the sky and ground into the same exposure range.
Even among the split-intensity, neutral-density filters there is some
variation. You can choose the number of stops difference between the
clear part and the gray part, and you can choose the rapidity with which
the clear and gray parts meet in the center of the filter glass. If
they blend gradually, it's easier to hide the earth/sky edge, but the
exposure on the edge may look a little funny. If you were shooting
boats on the ocean against a sky, a very sharp division would be fine,
since the horizon is basically a perfectly straight line.
A disadvantage of most of these filters is that you're forced to
compose the photo so that the boundary between earth and sky
passes through the exact center of your film, and that often is a
very severe constraint on composition. There exist filters that
are rectangular and can be mounted (with a special mounting
bracket) in front of the lens with the division between the
halves wherever you want it. Remember that with an SLR camera,
you can see the effect of the filter simply by looking through
the viewfinder, so the filter placement isn't just a wild guess.
There are some even more unusual versions where half is colored and half
is clear, but you'll use them even less commonly. One possibility is if
you like to "soup up" sunsets with a red or orange or tan filter, and
the sunset is over the ocean, you might want a filter that's half orange
and half clear.
Special-purpose Filters
There are all sorts of special-purpose filters that distort the image in
some way. Some turn highlights into stars of light, some make 3 or 5
copies of the image on the film, some cause blurring around the edges of
the photo, but leave the image in the center sharp for "vignetting" --
trying to imitate the crummy lenses of 150 years ago. Put on one of
these vignetting lenses and a sepia filter and you'll get shots that
look like the ancient photos you see of Abraham Lincoln or Jesse James.
There is a huge variety of these filters. Most companies that sell them
will have a brochure that clearly shows the special effects caused by
each one.
Since these special-purpose filters generally seriously distort the
light that gets to the film, there's often no point in spending a lot of
money for high optical quality in them. Companies like Cokin make a
wide variety of plastic filters that fit into special Cokin mounts on
the front of your lens. You can buy one mount, and then get as many
weirdo filters as you want for a few bucks each. If you get the B+W
filters, you'll pay $50 each for them.
Macro Equipment
Although macro equipment belongs on this page, it is a huge topic, so
I've got the information here.
Light-Tables and Loupes
Light Tables
I shoot mostly slides, so I find a light table indispensible. When you
project a slide on a screen, the screen is never quite flat and never
quite perpendicular to the slide, so you can never be sure exactly how
sharp your slides are if all you do is project them.
It's also a great tool for organizing your slides for a slide show.
You can move them around on the surface and see a whole bunch of them
at once. If you're using a light table for this purpose, you'll find
that the larger the table, the better it works. When I got my table, a
friend talked me into getting one that's about 18 inches by 24 inches
and I thought it was far too big. It's OK, but now I wish I'd gotten a
larger one. Mine is barely large enough to work with 2 (36-shot) rolls
of slides. The problem, of course, is that larger light tables take
more room to store.
If you care about exact colors, be sure to get a table with bulbs that
have an emission spectrum close to daylight. Standard fluorescent bulbs
put out a lot of green light so the slides will appear greener than they
will in projection or if you make prints from the slides.
There's not much rocket science involved in light tables, so if you have
any woodworking ability you can probably make your own for a fraction of
the cost of buying one. Just use the right bulbs if you care about
color.
Loupes
Loupes are the little magnifying glasses you use to look at slides on a
light table. A very cheap (and very high quality) loupe can be obtained
simply by using your standard camera lens (50 mm or so).
For a standard loupe, you can pay anything from $6 (for a plastic piece
of crap) to hundreds of dollars. I own two loupes, a Schneider 4-power
loupe and a Peak 10-power loupe. The Schneider cost about $120 and the
Peak about $40. I don't notice a huge difference between the optical
quality of the two, so if I were to do it again, I'd probably get a
cheaper 4-power loupe.
If you just get one loupe, get a 4-power version. You get quite a bit of
magnification but you can still see the whole slide at once. I got the
10-power much later and I use it as the ultimate check for sharpness
when I'm deciding which version of a slide to make a print of. My Peak
10-power loupe has a reticle engraved on it so that I can use it to
measure things on the slide down to tiny fractions of a millimeter. I
thought it would be cool to have, but I almost never use it. On the
other hand, it doesn't get in the way. It might get in the way on the
4-power loupe when I'm looking at the slide as a whole. With the
10-power, I'm only looking at tiny portions of the slide anyway, so I
look through parts that don't have the ruler engraved on them.
Return to the beginner's guide.
Want to send me mail? Click: (
tomrdavis@earthlink.net)
 On the right is a photo of a Rufous Hummingbird taken
using the TTL flash. Quite often, the first time you try this,
you'll get a bad photo -- the subject is completely over-exposed
and the background is totally black. What has happened is that
the camera is waiting until there's enough light to get a
proper exposure, and since the bird is so close to the lens,
all the light will come from the bird. To get what the camera
thinks of as proper exposure, and since nothing is coming from the
background, the flash keeps going until there's enough light from
the bird, but this is balancing out the pure black background, so
the bird is overexposed.
On the right is a photo of a Rufous Hummingbird taken
using the TTL flash. Quite often, the first time you try this,
you'll get a bad photo -- the subject is completely over-exposed
and the background is totally black. What has happened is that
the camera is waiting until there's enough light to get a
proper exposure, and since the bird is so close to the lens,
all the light will come from the bird. To get what the camera
thinks of as proper exposure, and since nothing is coming from the
background, the flash keeps going until there's enough light from
the bird, but this is balancing out the pure black background, so
the bird is overexposed.