Last Modified: October 27, 2003.
Following are a few suggestions for techniques you can use to learn to make better photos. They have worked for me, and I hope they work for you. Basically, there are two ways to improve your work: technical improvement, and artistic improvement. I suspect that my technical advice will be more accurate than my artistic advice, but I have truly struggled to improve the artistic quality of my photos, so even in that area I may be of some help.
I also include advice on how to learn to use your equipment so that it's second nature. When you get that once-in-a-lifetime opportunity to take a shot of a wild jaguar in Peru, you don't want to panic and screw up the exposure or something.
The problem is that film can only record intensities of light in a very small range compared to what the human eye can do. Black and white film is a little better than color film, but not all that much better, and with color film, if one portion of your scene is 100 times as bright as another, it is virtually impossible to avoid having the bright part be burned out white or the dark part so black that you can't see any detail (or both).
If there is a huge variation of light levels in your scene, it is called a "high contrast" situation, and your options for dealing with it are limited. Unfortunately, often the best advice is simply to avoid tripping the shutter and find something better to photograph.
Modern cameras have various methods to help you set the exposure, ranging from nothing (completely manual) to complete "program mode" where the settings are made completely automatically. Thus you can depend on your camera as much or as little as you want. But before you can decide whether to let the camera make the decision, you need to know what you mean by a proper exposure, and what the camera means by a proper exposure. If they are in agreement, let the camera do it; if not, you'll have to make some adjustments.
Luckily, for many scenes, you will agree with the camera's decision, and if you were blind, and taking random photos, your best bet would be to leave it to the camera and your shots, on average, would be pretty decently exposed.
But what an automatic camera does is to figure out how much light is coming in and adjust things like the aperture and the shutter speed to make the amount of light that arrives at the film during an exposure be an "average" amount, where this average is about enough to hit the middle of the film's range. But if you're shooting a photo of a big black dog that nearly fills the frame, the camera will think, "it's really dark out here -- I'd better let in more light, so I'll either open the shutter a bit or leave the shutter open for a longer time. As a result, your black dog shows up as a gray color in the final photo -- probably not exactly what you want.
As long as you know what the camera is trying to do, you can accommodate for it. For example, if your subjects are very light, you know that the camera is going to underexpose them to make the average color darker, so you should overexpose. Note that you are not really overexposing; you are in fact getting the correct exposure, but the logic in the camera thinks you are overexposing.
If you do know what you're doing, your thought process goes something like this: "That white dog in the snow that I'm trying to shoot is far too light. Left to its own devices, my camera is going to underexpose the scene by a full stop and a half. Therefore I will set the exposure compensation to be +1.5 stops, to compensate for what I know the camera is going to do." If the subject isn't so brilliantly bright, but it is brighter than average, you might choose to overexpose by only 1/2 or 1/3 stop. It's hard to explain how to figure this out -- you just learn from experience.
If you are unlucky enough to own a camera that does not have exposure compensation, it's still not too hard to get the effect you want. For example, suppose you have a totally manual camera, except that it has a light meter. You look at your white dog, and the light meter tells you that the correct exposure is f/8 at 1/125 seconds. You decide that this setting will underexpose by a full stop, so you can compensate by changing either the aperture to f/5.6 (one stop larger) or by doubling the exposure time to 1/60.
If you're going to take a whole bunch of photos of the same subject, and your camera doesn't have exposure compensation, one thing you can do is to lie to your camera about the film speed. For example, if you want to overexpose all your shots by one stop and you are shooting ISO 200 film, you can set the ISO rating of your camera to ISO 100. Then your camera thinks the film is twice as slow as it really is, so it will double the exposure time, which amounts exactly to a one stop overexposure. Once you've reset the ISO dial, you then shoot the photos with the shutter speed and aperture suggested by the camera.
Warning! If you set the exposure compensation or set the ISO rating to something unusual, it's just a matter of time before you forget and half a roll of film later notice that even though you've switched from the white dog in the snow to normal subjects, you've forgotten to undo the compensation, and you've taken 15 photos that are all overexposed by a full stop. I don't have any suggestions about how to avoid this. I still do it from time to time, and still kick myself. And I can even understand it if I had mucked with the ISO setting, but my camera has a standard exposure compensation, and right there on the bottom of the viewfinder is a little warning to indicate that I'm in exposure compensated mode, and I just don't look at it.
For example, suppose you think the correct aperture is f/8. To bracket by one stop in each direction, you will take three photos of your subject, one at f/5.6, one at f/8, and one at f/11. To be even more sure, take five shots, spaced 1/2 stop apart. Some cameras have an automatic mechanism for doing this, and on some, you just have to manually adjust the aperture between shots. If you bracket with 5 shots, you know that you are wasting 4 of them, but you also know that you're going to be within 1/4 stop of the correct exposure on one of them which is very good. (Assuming, of course, that you didn't completely mis-guess the correct exposure.)
I once had a friend who worked as the professional photographer at a NASA installation, and one day the photographers from National Geographic showed up to take photos for a feature story about that particular NASA location. My friend said that they set up each shot, and then took photos at every f-setting on the camera, basically wasting a whole roll of film for each possibly good shot. Most of the photos would be totally black, or totally white. But they were guaranteed not to miss the exposure, and when you consider what National Geographic was paying to have them at the site, the cost of a hundred rolls of film was basically nothing. Unfortunately, you are probably not in that position.
Of course bracketing is good if you've got a landscape or something that's not moving. You can't bracket a flying bird -- you've just got to learn to get the exposure right.
If your camera is set to full-frame metering, for example, light is sampled across the entire portion of the viewing area and averaged in some way so that the average of the whole scene will be in the middle of the exposure range for the film. If you are using spot metering, only a small circle in the center of the viewing area will be properly exposed. With the central metering option, a larger circle in the center will be correct. Usually, the viewfinder will have some circles or other indication of what parts of the scene are being metered.
If there is only one tiny part of the photo that is important, and you want to be certain that it is correctly exposed, use the spot metering, and that will guarantee a good exposure to a small circle in the center of the film. For example, suppose there is a lot of light contrast, so you know it's hopeless to get everything in the scene in proper exposure, but the photo includes a person, and you want to make sure that their face is properly exposed, no matter what happens to the rest of the scene, then you should probably spot meter on the face (or if the face is closer to the camera, use central metering on it), and let the exposure of the rest of the image fall where it may.
The spot meter is generally in the center of the image, and if you would like to spot meter, but on something that's not in the center of the scene, there are a couple of options. Some cameras have a feature called "exposure lock". It's just like focus lock, except that it allows you to set the exposure by pointing the camera directly at the subject you want metered, lock the metering information, and then recompose to put the subject of interest where you want it in the view. Some cameras even allow you to combine this with focus lock which makes sense, since it's very likely that if you're going to a lot of trouble to get the proper exposure on some part of your image, you'll also want that part of the image to be in focus.
If your camera doesn't have an exposure lock feature, you can still point the camera directly at the subject, read the metering information, and then set the camera in manual mode with the appropriate adjustments to take the photo you want. For example, suppose that when the camera is in automatic mode with spot metering, and you point it at your subject and the camera tells you that it would take the photo at f/8 at 1/60 second. But when you recompose the scene with your subject not in the center, things are much brighter and the camera wants to take the photo at f/16 at 1/125 (two stops difference). You just put the camera in manual mode, set the shutter speed and exposure to f/8 at 1/60, and shoot away.
In the real world, there is no such thing as a perfect camera, so the plane of perfect focus will really be curved a little and there will be other minor distortions, but the general idea remains the same.
The way I like to think about this is that your lens collects light all over its surface and focuses it to a point on the film. If you look at the light that goes to any particular point on the film, it all moves in a cone whose tip is right on the film. If the film were not there, the light would continue past the film, and would occupy a region of space that looks like two cones put together, tip to tip.
Now imagine that the film is in slightly the wrong position---either too close to the lens or too far away by a tiny amount. The light that strikes the film will now not do so at the point that's at the tip of the two cones, but rather in a tiny circle. In other words, the light from one point on your subject will not make a point on the film, but rather a tiny circle. It will be slightly blurred.
If the film error is greater, that circle will be larger, and notice that it will be larger whether the error is in front of or behind the distance of perfect focus.
Having the film in the wrong place is equivalent to having the subject in the wrong place. Subjects at different distances from the lens will focus at points at different distances behind the film. Imagine your scene is a set of bright points of light, each at a different distance in front of the lens. The light from each one that makes it through your lens will make a cone, but each cone will have its tip at a different point behind the lens. You can move the film to sit over one of the points so it will be in perfect focus, but all the others will be too near or too far, and all will be blurred, with the amount of blurring dependent on the distance of the theoretical tip of the cone from the film.
Generally, we focus on the one thing in the image that we're interested in and things in front of it or behind it are out of focus.
There is no way around this, but we can improve the situation by making the cones skinnier. With a fat cone, a little error makes big blur, and a skinny cone will have a smaller blur, all other things being equal. Now your eyes aren't perfect, so there is some amount of blur that's small enough that you can't see it, and so in reality, as long as the circles on the cone are smaller than that limit, the stuff will be in perfect focus, as least as far as your eyes can tell.
So there is a range of distances from the camera that appear to be in perfect focus, and that range is called the "depth of field". You can get a larger depth of field by making skinnier cones, and to do that, all you have to do is set the aperture smaller (effectively making the lens smaller). The only disadvantage is that less light comes in, so you need to expose longer for a properly-focused photo. If your subject is not moving, this is no problem, but if it is moving, of course, you're screwed.
The three images above were taken with the camera locked on a tripod and the only settings that were changed were the aperture and flash intensity. The flash was increased as the aperture decreased to get roughtly the same exposure in each shot. The uppermost was taken at f/3.3; the middle one at f/8, and the lower one at f/40. The camera was focused at the center of each image. See how smaller apertures (larger f/numbers) lead to more depth-of-field (more of the image in focus). You can often read on the lens barrel the depth of field---there will be a marker pointing at the distance of perfect focus, but there will be pairs of markers around it corresponding to different apertures. The tiny apertures like f/16 will be far apart, meaning that a large range of distances will be in "good enough" focus, but at f/2, the range will be tiny.
When you are focusing manually, or your camera is doing auto-focus, it works better if there is a lot of light, so the focus occurs with the lens wide-open (the largest aperture). When you trip the shutter, the lens closes down to the aperture you've set before the photo is taken, and then it re-opens afterwards. So since all focusing occurs with the lens wide-open, you can't normally see exactly what will be in focus and what will not. You'll just see the worst case---the fattest cones.
Some cameras have a "depth-of-field preview button" that closes down to the aperture you (or the camera in automatic mode) have selected. If you press this button while you look through the viewfinder, you'll see exactly how the focus will be. Of course things will get darker because there is less light.
Unfortunately, there are some other limits caused by diffraction so that you can't have extremely tiny openings. Light (since it is a wave phenomenon) is bent (diffracted) as it goes through tiny holes, so in practical situations, you can't shoot at much less than f/32 or so.
Another trick that can be used is to focus at the so-called "hyperfocal distance". Imagine that you are shooting a landscape, and the most important stuff is the mountains that are effectively infinitely far from the lens. Your first impulse is to focus perfectly on the mountains, and then, due to the depth of field, some of the stuff closer will be in good focus.
But there's a better way. Why not focus on something that's as close to the camera as possible in such a way that the mountains are at the far end of the depth-of-field range? Then they will be in focus in the photo, as will stuff much closer than in the case where you focused at infinity.
Another way to think of this is the following. If you focus at one distance, you're really focusing on a range of distances with the exact focus in the middle of the range. If you focus at infinity, you can't really focus beyond it, so that part of the range is wasted. Why not focus closer so that the far end of the range is infinity, and the near end is closer to the camera, giving more stuff in focus?
The distance that achieves this is called the "hyperfocal distance", and you can figure out where it is using the depth-of-field markings on your lens. Suppose you're shooting at f/11. Twist the lens so that the far end of the f/11 range is at infinity, and then the point of perfect focus will be at the hyperfocal distance. This gives you the largest possible range of stuff in focus that includes the mountains that are "infinitely" far away.
Ideally, you should write down all useful information just after you take each shot, and then you'll be able to refer back and have a better idea of what went wrong.
Of course there's no prayer of doing this all the time unless you truly have an anal-compulsive personality.
But I have found that if you occasionally go out to take photos with the intention of improving your technique rather than trying to take great photos, you can do this. For example, you've got a new flash, and you're not sure exactly what the settings do. Slap in a roll of film, set up some test shots, and just take a few dozen shots with different settings of the flash and the camera, being careful to write everything down. When the developed slides or prints come back, you then have the information.
Similarly, if you were interested in bird photography and want to figure out how slow a shutter speed you can use and still get an acceptably small amount of blurring on a flying bird, take your setup to the local dump where you have a million gulls to use as test subjects, and shoot a roll or two (again, writing down everything you do). When the slides come back, you'll know the answer.
But in general, the more you write down, the better. At least give yourself a chance of doing this by keeping a small notebook and pencil with your camera gear. Then you won't have the excuse of "nothing to write with".

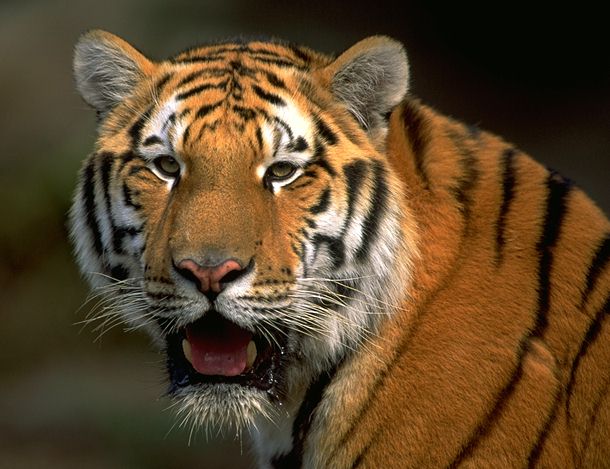 At the zoo, you can practice composition, often with additional
difficulties because you'd like to get a shot that looks natural,
and doesn't show concrete or bars. These photos are both from
the San Francisco Zoo.
At the zoo, you can practice composition, often with additional
difficulties because you'd like to get a shot that looks natural,
and doesn't show concrete or bars. These photos are both from
the San Francisco Zoo.
I like to do this during off-hours, so I won't bother other people. If the zoo is crowded, don't set up your tripod in the best viewing spot and then camp there for two hours -- give other folks a chance to see the animals.
And of course you don't have to go to the zoo. Just go somewhere that there are a lot of animals -- dumps have seagulls, the city park probably has squirrels, your backyard feeder has lots of birds (and probably squirrels too), et cetera. Practice on easy animals so that when you've got a rare one in your viewfinder, you won't screw up.
If you go to the Galápagos Islands, it's better than a zoo -- the animals are all pretty tame, there are millions of them, and there are no bars of concrete.
But what I've learned to do is to be merciless about my own work. Even if I like a shot very much, I look over it carefully, trying to find anything that's wrong. When I find something that I don't like, I make sure I understand exactly what's wrong, and see if I can think of some way to avoid making a similar error in the future.
If you're like me, you'll get more and more critical as time goes on, so it'll seem like you're not getting any better. You can remember that when you started, you got two or three nice photos per roll, and now, after working hard for a couple of years, you're now only getting one shot per roll.
But at least you can go back and look at your two-year-old photos, and you'll certainly see that they really aren't as good as you thought.
And as long as you're reasonable about it, you can ask such a person for advice -- bring in a couple of photos unrelated to the class and ask for an opinion. As long as it's just one or two, it's pretty likely that you'll get some useful criticism.
Even one- or two-day workshops sometimes include time for criticism. I've done a couple of them where in the evening after the first day, each of us students brought in four or five of what we thought were our best shots, and the teacher just puts the whole batch into a carousel and goes through them, making comments. It can be a little depressing when your professor trashes your five best photos, but I can guarantee that it'll be a learning experience.
Not only is this sort of exercise highly educational, but it is also a very pleasurable experience.
Usually the person leading the workshop will take you to an interesting place, where there are plenty of photo opportunities. If the leader is good, you'll get interesting assignments, like "take photos, but they have to include this particular tree". (Notice that you don't need a leader for this -- you could easily "assign" yourself to do something similar -- but it is nice if there is a group of people all doing the same assignment, and it's fun to see how the imaginations of other people work.
Sometimes there is a session where the leader criticizes your work, and you'll learn a lot from that.
But go with the flow. If the teacher happens to be an expert in some area, learn about that. I once signed up for a workshop on "Nature Photography", figuring that we'd go out and get photos of animals and stuff, but to the leader, "Nature Photography" meant flowers, and flowers only. So I learned a lot about photographing flowers. If I'd insisted on doing animals, I wouldn't have learned anything.
Finally, you'll have a good time, you'll almost certainly meet some folks you like, and who knows -- you may even get some good photos.
I don't know how to avoid this, except to force yourself to stop and think before each photo. Scan the entire image -- not just the part you're really interested in -- and maybe it can be made a lot better by moving the camera a bit.
If you are shooting a person or an animal at such a position within the frame, it's usually better if he/she/it is looking into the larger portion of the frame. In other words, if the person is on the left, have her looking right, et cetera. Otherwise, she appears to be looking out of, rather than into, the picture.
Remember that with cropping, you can often fix up a photo that is taken with the subject centered -- just lop of part of the frame either on the left or the right.
Return to the beginner's guide.
Want to send me mail? Click: ( tomrdavis@earthlink.net)